
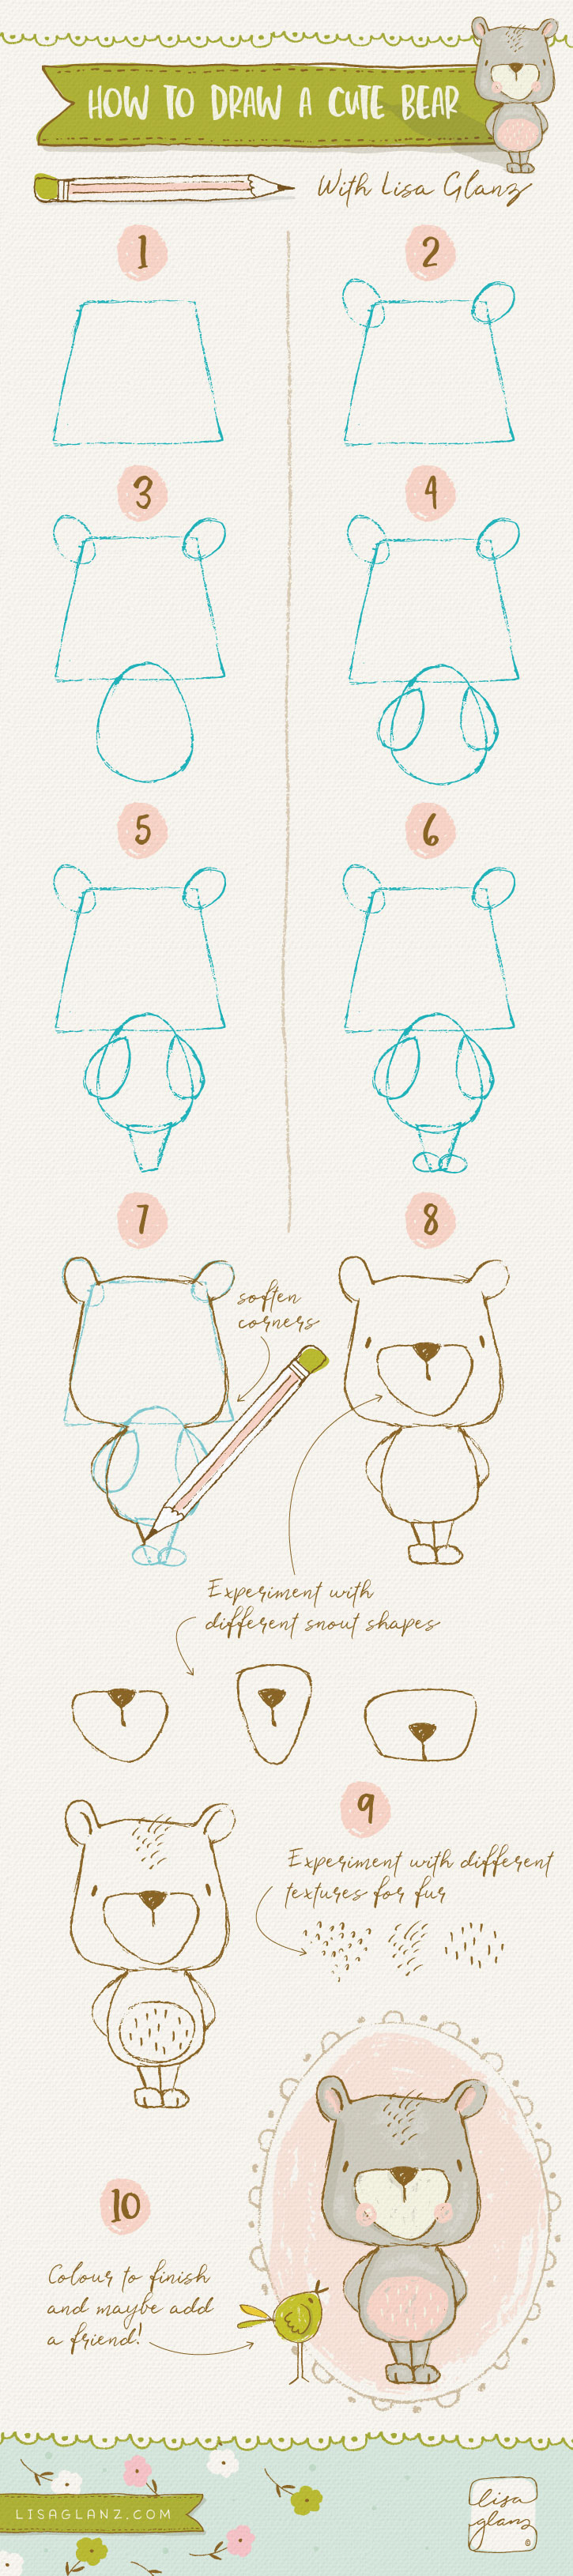
I take you through 10 easy steps on how to draw an adorable bear.
Drawing cute characters doesn’t have to be daunting. Once broken down into simple shapes, you can tackle just about any cutie!

Use a pencil to draw the shapes. At this stage your lines can be loose and sketchy.
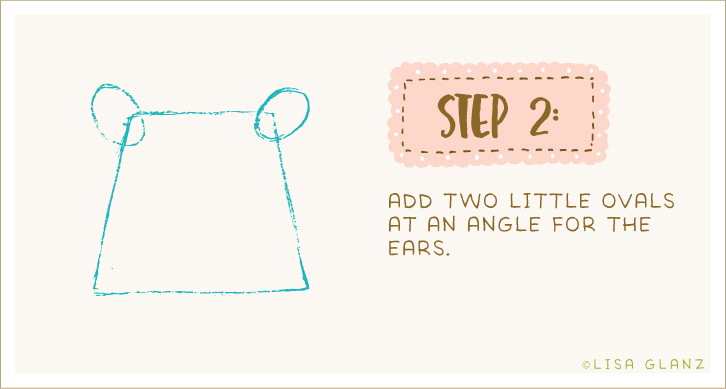
You can also use circles for a more rounder ear.
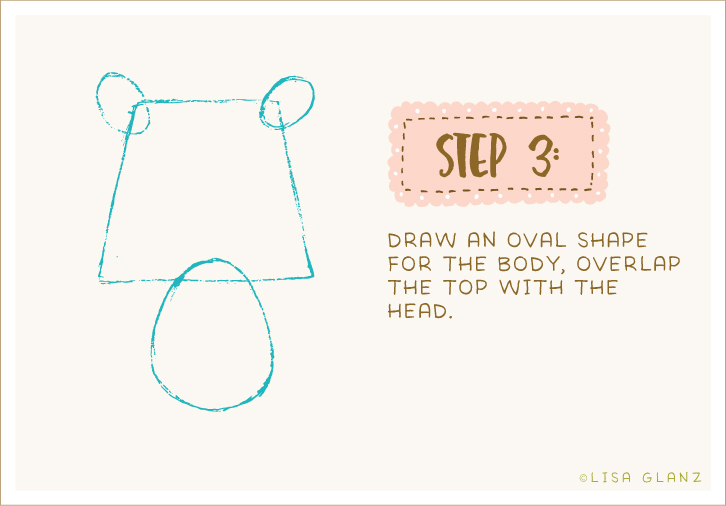
Play around with different oval shapes for the body. Maybe you’d prefer a chubbier tummy, or a more oblong shape for a taller bear.
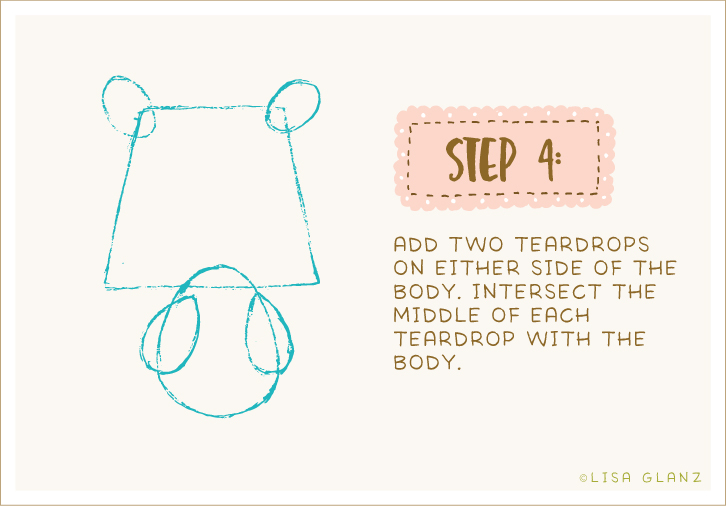
We’ll be placing bears hands behind his back, it’s a great way to cheat if you find drawing arms and hands intimidating.

Legs can be together or apart. For legs standing apart, simply draw two rectangle shapes slightly apart from each other.
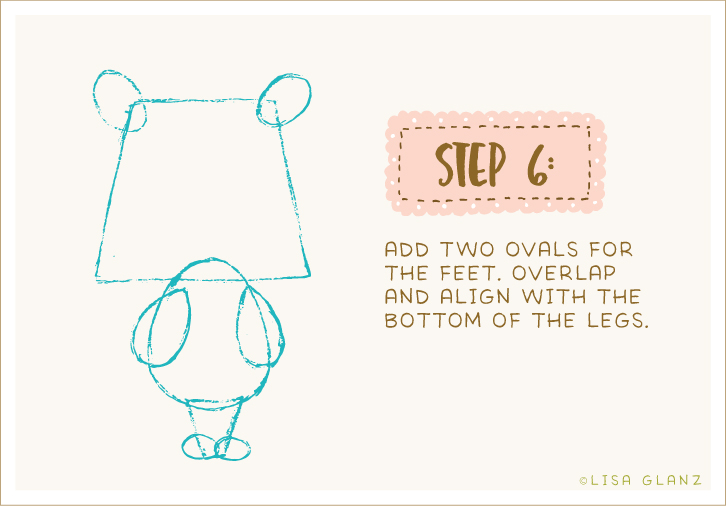
You can experiment with the size of the feet.
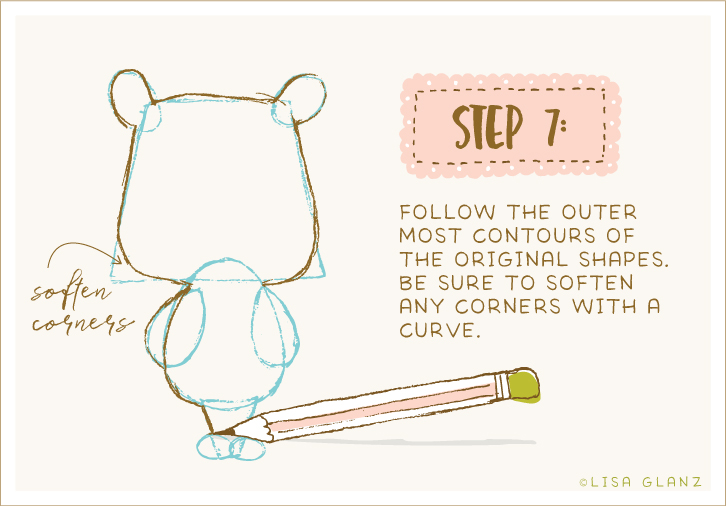
Using a pen directly onto the original drawing, or a light box to trace the original sketch, draw or trace over the outer contours of the shapes. Keeping in mind which lines should be left out and which ones to include. Soften any corners to keep the shapes organic.
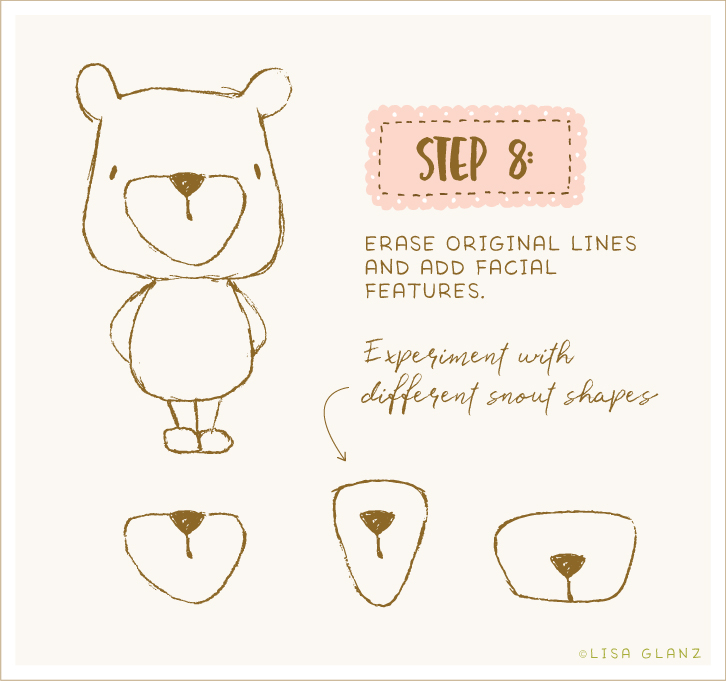
Erase your pencil work and add in some facial features. It’s fun to experiment with different snout shapes. If you’re not confident drawing the snout directly in pen, first sketch it out on your original drawing until you’re happy with the shape.
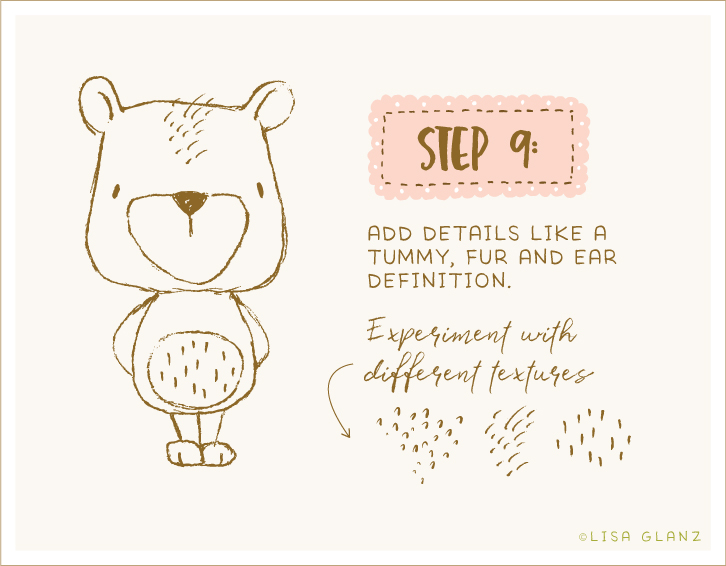
Add some character to your bear by including some fur or other cute markings.
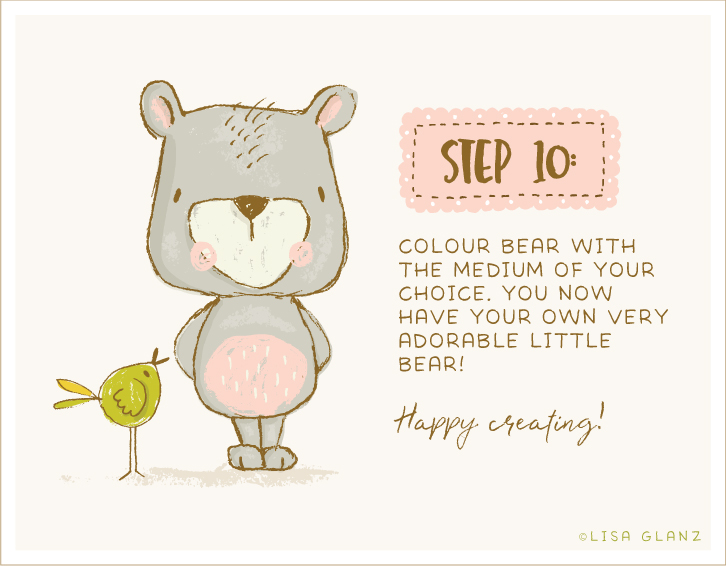
If you like you can add colour to your bear in the medium of your choice, like watercolour or colour pencils. I’ve chosen the digital route. Have fun! There’s no right way or wrong way, there’s only your way.
Hope you enjoyed this quick tutorial! You can grab this little cutie with variations in my freebies section.


Thanks, Lisa! This is so very cute! I have sent this to my daughter, who is 8 and loves to draw. I can’t wait to see what she comes up with!
Aw! That’s so wonderful to hear! Hope she enjoys the tutorial 🙂
This is so cute! Thanks for the drawing lesson and the freebie!
It’s a great pleasure Marjo, glad you like it!
Thanks! Love your work!
Great pleasure Erika!
thank you thank thank you!!! love love love this!!!
Yay! So happy to hear that 🙂 Enjoy!
Thanks Lisa! I love your drawings – so cute!
It’s a great pleasure Andrea 🙂
This is adorable and so nice of you to share your talent with us! Hope that this is the beginning of more drawing lessons to come…
Thank you Gail. Yes, I am hoping to add more like this one. Glad to hear you like it!
I really really love your work. thank you so much for this tutorial. I’m a big fan. Hugs!
Thank you Patric, that’s so nice of you to say that! Glad you enjoyed the tutorial!
Thank you so much Lisa! I’m a huge fan and I love trying out new creative things trying to learn.
That’s fantastic to hear Anna! Hope you like trying out this one!
You make my day with this adorable pictures! Thank You, Liza, you make the world better!!
That’s so nice of you to say that Katherin, So glad you like it 🙂
Thank you very much.
Great pleasure!
This is so nice ! Thank you !
Glad you like Adriana! It’s a pleasure.
This is adorable and SO helpful, thank you! In one of your latest emails you mentioned that Fridays are for experimenting. How did you come up with a weekly schedule that works for you? Especially to allow you to give adequate time to work and experimenting 🙂 Thanks!
Hi Kyra,
So glad you like the tutorial! I base my schedule roughly on my energy levels. So on Monday and Tuesday I’m fresh for the week so I usually work on a product or client work. Wednesday/Thursday I tackle the less creative stuff like admin etc. Friday’s for me have a more fun energy because generally I’m more “excited” about the weekend and have worked pretty hard all week, so I try and use that positive energy to my advantage. Whenever possible I take Friday to play, even if it’s just for a few hours. Most of the time, I actually end up using my creations in my products or portfolio, so I don’t see it as a waste. I try and put that time aside otherwise there’s always some work commitment that can get in the way, so I schedule it like I would a job, it’s the only way I can stick to it 🙂
So sweet 🙂 Thank you!
Glad you like it Donna!
Thanks Lisa for teaching us how to draw!
It’s a great pleasure Claudia! I hope to do more in the future.
So cute! Sending this tute over to my 10 yr old who loves drawing tutorials like this. Thank you!
Yay! That’s so awesome to hear Jamie. Hope your 10 year old enjoys it 🙂
Hi Lisa! Saw your bunny illustrations and was totally inspired to make my daughter’s birth statistic frame using them. Can I buy a part of your illustration like just the bunny figures to use for the frame? Also how do you convert your drawings into digital format and how do you colour digitally? Thanks
Hi Rishu,
So glad you like the bunnies! Unfortunately that set isn’t sold with the items separately, so sorry about that!
That style of drawing, including the bear drawing, is vector based when the piece is finished. The best way to convert your drawings to vector format would be to scan them at a high resolution, then use the auto trace function in Adobe Illustrator. From there I usually use a number of different ways to add colour. Sometimes I scan in texture shapes and vectorise, or draw vectors directly in Adobe Illustrator. I also use procreate app on my ipad to add colour. It’s basically a combination of hand drawn and computer work that is eventually all vectorised so I can work in Adobe Illustrator and colour as I need.
Hope that helps!
Oh my goodness – this brings back memories of watching TONY HART!
Oh gosh!! I’m thrilled to hear that! I LOVED Tony Hart 🙂 He was kind of like my childhood hero!
Did you create your own brush? How do I get my brushes to look pretty like yours? Is there a special trick?
Hi Maribel, I draw everything on paper, then scan and bring into Adobe Illustrator. So I don’t use any brushes in that app. I create all my textures either on paper or using Procreate on my ipad. Experiment with different pencils, charcoal, pens etc and see how they scan in. It took me a while to find my happy medium so I would say just play around with processes until you are happy with the results. Then write down what you did, or save settings so you can replicate it for the next time 🙂 Hope that helps!
That’s a great idea! I will do that. I also bought some pencil brushes for illustrator. They are pretty cool. Namaste. Keep doing your magic Lisa!
That’s great to hear! There are some amazing brushes out there, hope you enjoy using them 🙂 Thank you so much Maribel, I really appreciate your encouragement and support xx
Hi Lisa, do you always start drawing with frames, or you directly doodle or sketch it? Thank you for the tutorial, it simplify what looks like a complicated drawing. It helps a lot ^_^ I hope you can make another tuts like this.
Hi Nenny,
If it’s a complex character or item, then I usually do a quick rough shape outline to get a feel for the basic structure. But I’ve been drawing for some time now so sometimes I can skip that step 🙂 Practice helps with that!
So happy to hear you found it useful. I do hope to do more in the future.
Hi Lisa!! I love all you do and crack up listening to the podcast!!! I hope you will consider teaching another skillshare class! I learned so much and could easily see myself binging on your content!
Hi Liz,
Glad you enjoy the podcast and have a little giggle along the way too! I will definitely be teaching another class soon which will hopefully be about using Procreate and Illustrator together in your work. So happy to know that you’ve already learned so much from the previous one! Yay!
Inspiring me in your work. What a cutest job of all! For me, who didn’t know how to draw a kitten. I got it with this tutorial. Amazing!!
Yay!! So happy about that Paula!