
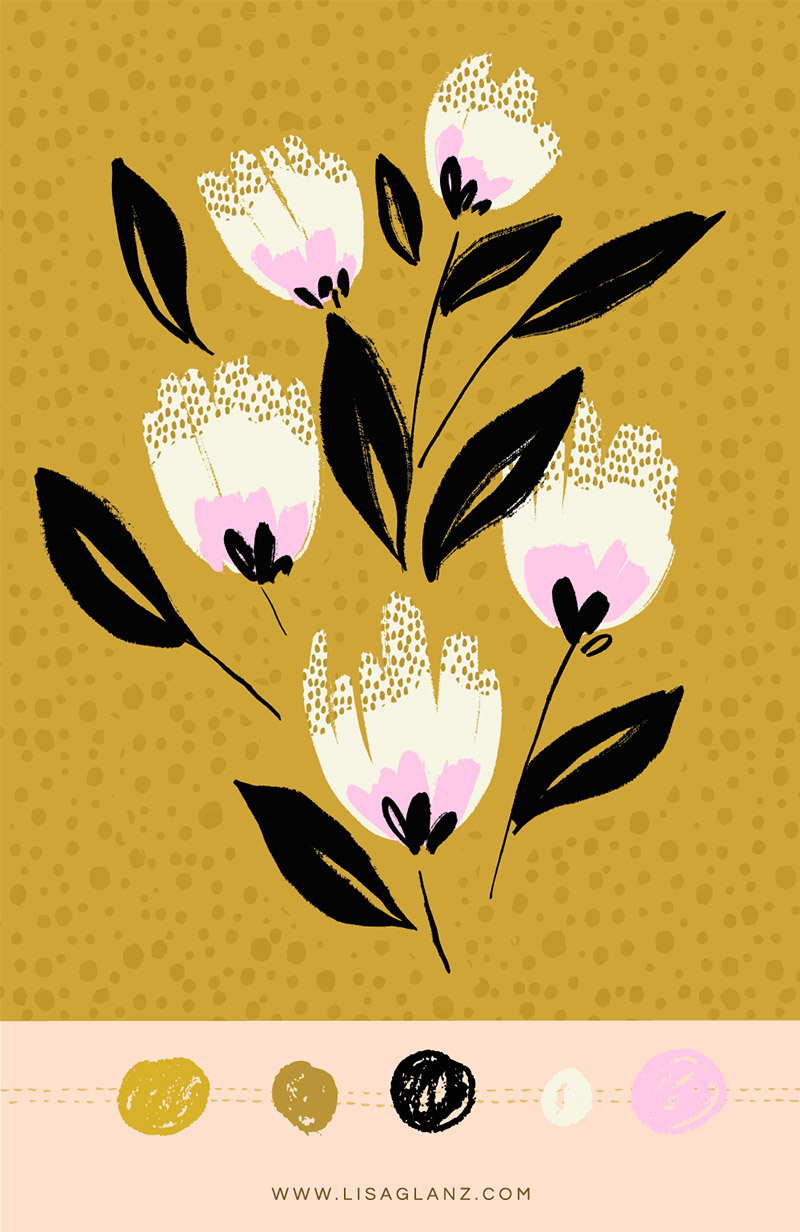
Learn how to draw a lovely bold botanical design in just a few minutes, a quick tutorial perfect for Procreate beginners.
We’ll first plan our design using one of the shapes from the Character Drawing Toolkit. Then move onto applying bold colours to create a modern botanical bouquet.
Using just one of the brushes from the Instant Artist Brush Collection, you’ll learn how to effortlessly create petals and leaves rich in brush stroke texture. We’ll use a limited palette that’s bold and bright.


Thank you! That was so much fun!
Yay! So glad you enjoyed Leah!
I am not having any luck using the deliciously inky brush. I tried the both sets of brushes thinking that my iPad was older than I thought. I get nothing like what is demonstrated. Not sure why.
I think I have worked out part of the problem. I was working on a canvas that was to small. The brush works better at the size you recommended rather than the 7×5 inch size I was working with.
V.
Hi Victoria, Glad you are all sorted! Yes the canvas size will have an impact on the brush texture especially if you are using a very small size. It’s best to rather go high-res and bigger then scale down if needed. That way you will also have the artwork at a good high-res quality in case you ever wanted to print larger. Happy creating!
Yay, a floral tutorial! My fav! Thanks Lisa!
Hope you enjoy Claudia!
Hello Lisa, I’ve just bought a few packs of brushes and started learning, but I can’t find the LEMON tutorial from the Instant Artist pack. I try to follow the info from the source file but the video tutorial will be very helpful to see step-by-step what we need to paint first 🙂
Hi Iwona,
So sorry for the confusion, there isn’t a video tutorial for the Lemon illustration unfortunately. The source file included is a guide on which brushes I used to create the elements in the drawing. However I’ll add the lemon tutorial to my list of tutorials suggestions, I usually work on tutorials that get the most requests. Hope that answers your question. If you have any other questions at all, please don’t hesitate to let me know.
My IPad (9th generation 2021) didn’t allow me to create more than 9 layers maximum. How do you do it? It told me “maximum number of layers reached”.. 🙁 I had to improvise to finish this wonderful pattern… Please advise me. Thank you. Dora
Hi Dora,
The amount of layers made available in Procreate is directly related to your iPad size and capabilities. So a bigger iPad with more RAM etc will mean Procreate can handle more layers per document. There is a way around that, you can either make your canvas size smaller to make more layers available, or you can work until you run out of layers, then make a duplicate of the file, open the new duplicate and flatten the layers you have already to make more available and add new layers as you need them. That way you will still have the original layers in the previous document should you ever want to adjust them. I used the second method all the time when I had a 9inch iPad. It’s not ideal but it’s a good work around. Hope that helps!
Thank you for this fun tutorial! It was great to see a new way of using a couple of your brushes. I get stuck not being able to think all of the creative ways to use them. I love seeing your process.
Yay! So glad that inspired you Amy!