
This tutorial takes you through a step-by-step process on how to use the Personalised Portrait Creator to create your own unique custom portraits in minutes!
If you need a little help combining your portraits into one document once you’ve created them, pop over to this tutorial.
Easily creating unique, hand drawn custom portraits that will wow your clients, impress your family and friends and even jazz-up your blog.
I’ve updated the set to include children and pets, which means creating a custom personalised family portrait couldn’t be easier.
The set is available in my shop which you can find here.


Will there be a expansion pack for body types?
Hi Mary, Yes I’m hoping to start of a fuller figure option for the woman and man portraits soon!
Hi LISA,
Please advise on what app should the portrait creator be opened on?
Hi Geta,
You would need either Adobe Illustrator, Adobe Photoshop or Affinity Designer for desktop. You could also use a free online app called Photopea.com which works well with the Adobe Photoshop version of the Portrait Creator. Hope that answers your question. If you have any other questions at all, please don’t hesitate to let me know.
Hey, I’m not seeing a lot of the options in the pack I just bought that you have in your video. For example: jeans & tank top, any of the dresses, leggings, eyes, mouth, etc. Am I missing something?
Hi Mary, the update will go live tomorrow (19th) on Creative Market, so you will definitely be getting all the new goodies free as you are already an owner of the kit 🙂
Hi Lisa I purchased your original Portrait Creator in a Bundle in June 2016 through Design Cuts, will I still be able to get the updates Free as well?
Thanks so much
Teressa
Hi Teressa, If you purchased the product via one of their bundles, although it’s not usually standard practice to update bundle products due to the low price of the purchase, I still want the bundle customers to benefit as well, so Design Cuts and I have set-up a special rate for bundle customers. For a small additional fee you can get all the new updates I’ve added since you bought the kit.
You can get in touch with them and they’ll assist you with that: [email protected]
Hope that helps! If you have any other questions at all, please don’t hesitate to let me know.
thanks
Great pleasure! If you need further assistance, let me know 🙂
Hi Lisa
I’m loving the Portrait Creator – my daughter and I have had great fun creating many of our family members and friends. I am having trouble figuring out how to collect family members together in one picture and use the backgrounds. I didn’t see this covered in the instructions or in the tutorial. Can you explain how to put multiple people in the one image? Thanks very much. Dallas
Hi Dallas,
So happy to hear you and your daughter are enjoying the Portrait Creator! Combining your portrait into one document can get a little tricky especially in Photoshop given all the layers. So I’ve put together a quick tutorial that takes you through that process. You can find the new tutorial here: https://www.lisaglanz.com/blog/combine-portraits-one-document/
Hope that helps! If you have any other questions at all, please don’t hesitate to let me know.
HI,
I saved these portraits as Jpegs but when I go to upload them to walgreens or shutterfly they say there is an error and that type of jpeg isn’t supported? How should I save them so they can be printed? Also is there a better place to print them?
thanks!
Bryana
Hi Bryana, It’s more than likely the colour mode that Shutterfly doesn’t “like”. So under the Menu Image > Mode, make sure you have converted the colour mode to RGB and resave your jpeg and try again.
That should do the trick 🙂
If you have any other questions at all, please don’t hesitate to let me know.
Hi Lisa,
Just bought you pack, got it cause i wanted to make a portrait of my mom with her pomeranian
and my cousin with her golden retriever but there is none.
Also, will you make another figure for men and women which is between the thinner one and the medium figured one?
Also, how to I merge these created portraits with one another without having to copy all the other layers?
Hi Kim,
So sorry to hear you are disappointed! I do try to include all the pets that are available in the pack in the previews as I know there are many breeds that aren’t included even though the set has 68 dogs. I am hoping to add more to the set in the coming months.
You can find a quick tutorial on how to merge your portraits into one document here: https://www.lisaglanz.com/blog/combine-portraits-one-document/
Hope that helps! If you have any other questions at all, please don’t hesitate to let me know.
Hi Lisa,
Is there an option for pregnant women?
Hi Nicole,
At the moment there isn’t a pregnant woman character. I’m hoping to create additional characters in the near future that can be purchased separately, like a pregnant woman for example. 🙂
Let me know if you have any other questions.
^^ Please add mamma holding twins if so! I will gladly purchase that lady! <3
Hi Brandi,
Thank you for your suggestion! I will definitely add it to my ever-growing list of requests – I try and include the most requested items in the upcoming updates.:)
Is there a tutorial on how to apply patterns?
Hi Daniela,
You’ll find instructions on how to apply patterns in Adobe Photoshop on the last page of the Instructions pdf file included, or you can find a video tutorial here. I’ll pop you an email shortly as well 🙂
Does this not work for Creative Cloud PS?
Yes, this will definitely work in Photoshop CC.
I’m trying to upload through actions but it just takes me to each individual file and won’t let me select them? I could use some help getting the program onto photoshop!
Hi Mikalea,
Sorry to hear you are struggling. This is not an app or action, but rather photoshop documents you open up Photoshop, So once you have the folder of the Photoshop version expanded, navigate to the Portrait you’d like to work on. Select your file (like Woman body type 1 for example) and double click the .psd file to open in Photoshop. The .psd file should automatically open up once double clicked. But be sure that you are opening the .psd files and to the Illustratior files (.ai).
The tutorial video above takes you through creating your first portrait. You can also read the PDF instructions included.
Hope that helps. Let me know if you have any other questions.
Thanks, Lisa
I’m having a problem with any of the extras, (dogs, flowers, patterns). The only thing that will load into photoshop is the people and pre made backdrops. it wont let me drag and drop or open any of the others. Please help!!!
Hi Mallorie,
The extras for the Adobe Photoshop version are PNG files. These won’t open the usual way by double-clicking. So the best way to open them would be directly from Photoshop, which would be File > Open… then navigate to the item you’d like to open and click Open. From there you can drag their layer into your working doc so they appear as new layer in that document. Hope that helps!
I just downloaded, and I don’t have any of the options for clothing that you show in your tutorial. 🙁 I also don’t know how to change colors of things in PS as it’s different in the program you use. I’m doing my son currently and he’s got like 3 shirt options and either shorts, or pants. I don’t see any legging options for women either. 🙁 Help.
Hi Lindsey,
The video tutorial takes you through changing colours of items in Adobe Photoshop at the 5:00min mark. Although most of the tutorial is in Adobe Illustrator, I do flip between Adobe Photoshop and Adobe Illustrator if the processes are different. So at around 5mins in you will see how to change the colour.
To answer your clothing question, I used body type 2 of the woman in the tutorial. Body type 1 has slightly different clothing to body type 2 and 3 – these two were the newest bodies I added plus they have more outfits. I am hoping to add these same outfits to body type 1 in the new update.
For the children, they won’t have as many outfits as the adults. I try and work on the most requested items in the updates and by far it’s always more outfits for the adults. But this is an ever expanding kit and I also add any suggestions I get to my list so if there’s anything specific you would like to see for the children please do send me your suggestions.
Hope that answers your questions. If you have any other questions at all, please don’t hesitate to let me know.
Happy creating your portraits!
Do you know when you’ll be adding the other clothing options to body type 1?
Thank you!
I’m hoping to finish the update in a coupe of months if all goes well 🙂
Any chance of a military character?
Hi Jenni,
I will definitely add your suggestions to my ever-growing list of requests – I try and include the most requested items in the upcoming updates, or possibly create additional add-ons to purchase separately.
Hi just purchased the PPC I am using it with PS CC. I downloaded initially worked on one portrait and had no problem I started a second person and I don’t have any options to personalize? Any ideas on what happened? I re-downloaded a second time to see if that would correct it but no avail. I cant double click on the body type to get the drop down additions. Any help would be appreciated!
Hi Kelly,
Sorry to hear you are struggling. When you double-clicked on the second portrait, are you sure you choose a PSD file and not an AI file? For Adobe Photoshop just be sure you are only opening up the files with the extension PSD. If you’ve managed to create one already, I can only think that it’s perhaps the wrong file you are trying to open. If you’re still struggling, please do send me an email and perhaps a screenshot of the files you are trying to open so I can assist you further. Email: [email protected] Thank you.
How do we change the color of the hair without losing the “strands” detail in the hair? When I fill in with another color, it becomes one solid color! I’ve had to work around this by selecting two different hair colors, changing the color in one of them, and then bringing down the opacity. Is there an easier way? (I’m using Photoshop.) Thanks!
Hi Elle,
You can use the Hue and Saturation tool in Adobe Photoshop or the Color Balance tool – you will find them both under Image > Adjustments. That way when you make adjustments you are adjusting all the elements on that layer and changing the hue of them as appose to filling over them with a flat colour.
Hope that helps! Happy creating your portraits.
Hi Lisa! I am having fun creating lots of people for my family. I thought all the adults had the option to have an arm out – but have only found it in a few places. Am I missing them, or is it limited? I look forward to new additions as you make them. I too would love military, pregnancy and some more dogs. (My sister has a rottwieler and while I can fake some dogs with a little editing – thats not one of them.)
So happy your are enjoying creating your portraits! At this stage the new body types 2 and 3 don’t have the additional arm option, but I will be including that in the upcoming update. Also thank you for your suggestions, I will add your suggestions to my ever-growing list of requests – I try and include the most requested items in the upcoming updates.
I am trying to change the clothing colors and I have the locked the transparent pixels like you said in the video (I’m using PS) but when I change the color, it is changing the entire piece of clothing.
Thank you!
Hi DeAnna, I tried to replicate your problem you mentioned so I could assist you better, and the only way that happens is if I don’t lock the pixels, or create a empty new layer that has nothing on it. So the only thing I can think of is you might not be locking the pixels on the actual layer you want to change. Or you are using the Edit > Fill menu instead of the colour overlay option in the layers panel.
Be sure to select the layer you want to change and not the entire folder. And double check that the pixels are locked before applying the colour overlay. Hope that helps!
Hi, Thank you for answering this question! How is that done by changing the color overlay? I was using the Edit, Fill option you have in the video, but it keeps changing the entire piece of clothing.
Thanks!
Hi Sydney,
You will find the color overlay effect in your Layers panel right at the bottom (the little fx symbol). Remember to only select the individual dress item and not the entire group, so expand the dress group and look for the dress layer, exclude the belt or button or other details otherwise it will change the colour of the entire outfit – have another look at the video to see which layer I selected. Once you have the correct layer selected, click on the fx at the bottom and choose color overlay. From the pop up you can select a new colour and click OK.
Hope that helps!
Hi
Is it possible to use this package in CorelDraw 2017?
Thanks
Michelle
Hi Michelle,
So sorry but unfortunately I can’t say for sure if it will work in CorelDraw as I don’t have the software. The Adobe Illustrator files in the kit have very complex layers and sub-layers, so I’m not sure if CorelDraw will retain that once imported which is crucial to creating the characters. If you have any other questions at all, please don’t hesitate to let me know.
Will you be adding any disabled aids in the future? Looking for a child in a wheelchair if possible!
Thank you.
Hi Tracy,
It is my dream to do that one day but it means creating an entirely new kit as I would need to offer various ages/characters. This current kit took over a year to create so it unfortunately comes down to my available time. But it is my wish to possibly offer that one day 🙂
Hi Lisa
I LOVE this! All I need is Photoshop to use it?
Hi Lynn, Yes 🙂 You need Adobe Photoshop CS3 or newer. If you have any other questions at all, please don’t hesitate to let me know.
Loving it! I’d love to see a pit bull in the dogs in the future. My only complaint right now is that with women you have the choice between rail thin, round, and rounder. I’d love to see a little curvy. The size of body style #2 but with a waist more accurately matches most of the women in my life. But otherwise, this is such a fun set.
Hi Rebecca,
Not sure why I missed your comment, so sorry for the delayed response! The next update includes quite a number of new breeds, but no pit bulls for now I’m afraid, but I will definitely add a pit bull to my ever-growing list of breed requests 🙂
And thank you so much for your feedback regarding the body shapes. I really appreciate any and all comments so I can work on the most requested items for future add-ons or updates to make the product even better.
Hope you continue to enjoy the kit!
Hey Lisa, I absolutely love you Portrait Creator! I have not yet purchased it, but and very interested. I recently purchased a Cricut and feel fortunate to find your site! I wonder which program do you suggest is the best for a beginner? Adobe Illustrator or PhotoShop?
Hi Angel,
So happy you found my site too 🙂 I would recommend Adobe Photoshop for a total beginner. It’s a little less overwhelming if you stick to the basic tools. If you want to challenge yourself Adobe Illustrator is a fantastic app to learn. In terms of graphics and editing graphics and clipart, it’s the best by far for vector work. Hope that helps!
Hello there, so glad I found your page I am interested to purchase this. Will it work in Adobe Photoshop Lightroom 5? I tried to read through the threads but didn’t see it discussed. Thank you so much!
Hi Kinga,
So happy to hear you are interested in the product! Unfortunately this kit won’t work in Lightroom. You need either Adobe Illustrator or Adobe Photoshop CS3-CC to use the files. Hope that answers your question.
If you have any other questions at all, please don’t hesitate to let me know!
I just purchased in Creative Market and want to say this is brilliant! So fun to play with!! Thank you so much for sharing such a wonderful set of drawings.
I also want to reiterate a request from above … I’d love to have the clothes options in woman’s body shape 2 and 3 available in woman’s body shape 1. For a ‘work around’, I copied the little black dress into a body shape 1, decreased the opacity so that I could see the body underneath, and just started erasing. Not perfect, but definitely fun to play with 🙂
Thanks again and p.s. you have a lovely accent 🙂
Hi Kasandra,
You are so lovely and kind, I really appreciate your comments 🙂 I’m thrilled to hear you are enjoying playing with the set. The good news is, I’m almost finished with an update that will include all the woman having the same clothing options. As well as all the man body shapes will have the same clothing options so you won’t need to work around that in the future 🙂
Hope you continue to enjoy creating your portraits!
I purchased this last night nd I am currently using Photoshop CC 2018. Whenever I try to open the files I am only seeing the AI files and not the PSD files…not sure what I am doing wrong
Hi Michelle,
I sent you an email as well, just on case you miss the answer here. It sounds like you make be opening the folder for Adobe Illustrator. Once you’ve unzipped the main folder, you should see two main folder:
Illustrator-CS3-CC
Photoshop-CS3-CC
You are only going to expand the Photoshop-CS3-CC folder. You could actually remove the Adobe Illustrator folder entirely if you aren’t going to ever use the Adobe Illustrator version on your computer.
Once you expand the main Adobe Photoshop folder, this is what you should see:
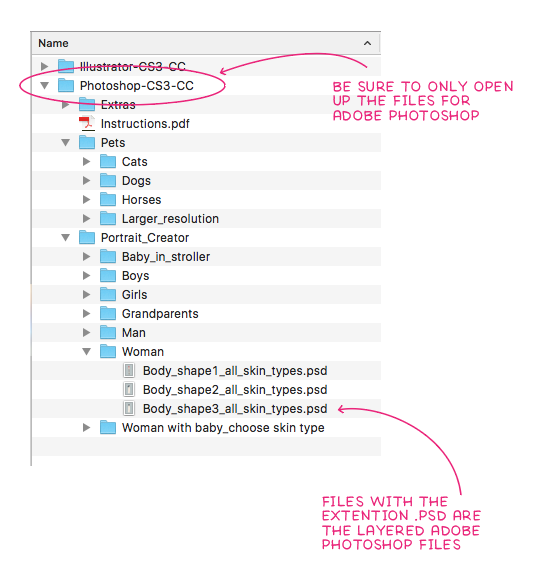
So all the files within the main folder called Photoshop-CS3-CC are the ones you will be using.
Hope that helps! If you have any other questions at all, please don’t hesitate to let me know.
Hi I have just purchased the portrait creator and keen to get started. It is not something I have used before in Photoshop, I am used to images. I am probably being a bit dumb but I cannot work out how to actually get the folders to open up in the Layers panel so I can get started. Can you please point me in the right direction. Many thanks.
Hi Debbie,
Thank you so much for your purchase, it’s much appreciated! You can just simply double click on a portrait file with the extension .psd. In other words, you don’t need to import anything, just simply open up a portrait you want to work on like the Woman “Body_shape2_all_skin_types.psd” for example. Once you have that open in Adobe Photoshop, you can expand your layers panel and start playing around with turning layers on and off.
I recommend you having a quick look through the PDF instructions as well that you’ll find in the download. It takes you through a step-by-step to create your first portrait/
Hope that helps! Pop me an email if you still need help: [email protected]
Hello! I just bought this package and i’m so excited to get started! How do I combine more than one portrait to create a family portrait? Thanks for your help!
Melissa
Hi Melissa,
Thank you so much for your purchase, it’s much appreciated! I have a tutorial that takes you through combining your portraits, you can find it here: https://www.lisaglanz.com/blog/combine-portraits-one-document/
Hope that helps! If you have any other questions at all, please don’t hesitate to let me know.
Hi! I am LOVING playing with this. I’m just getting started by creating myself. Body is done and working on accessories. Is there a way to change the glasses color? I see that the kids have a dark medium sized frame but the woman has pink ones.
Never mind – figured it out!
Hi Krista,
Glad you managed to sort it out 🙂 So happy to hear you are enjoying the set!
When I copy the pets into a new picture, the colours spill out as they have no outline. What am I doing rong?
Hi Louise,
We popped you a message on Facebook as well, I’ll just include it here too incase you missed it.
So sorry to hear you are struggling with placing a pet in Adobe Photoshop. I haven’t come across such an issue in the past, it looks like a technical glitch from your image you sent. Have you had this happen before, or has it only occurred in this new document you’ve created? It could have something to do with how the document was set up. I suggest trying a new document, maybe one of the pre-made backgrounds included in the kit. If it happens again in that document then it might be worth restarting the computer and Adobe Photoshop. I also recommend rather dragging and dropping the PNG file into your working doc, rather than copy and paste. So all you need to do is have your PS doc open in the background, then from your files on your computer, select the cat and drag and drop into the PS doc. Hope that helps! Let me know if that works.
Hello! I LOVE your product!! Do you have additional packages that can be bought that include more wardrobe choices – looking for additional wedding dress and formal options as I’m a wedding photographer and want to create these for my couples as a special gift. Thank you!
Hi Nicole,
So happy to hear you are enjoying the kit!! I do plan to create additional add-ons in the new year which will include new outfits etc. I have a fairly long list of requested items so I’ll be working through the most popular items first. I’ve added your wedding dresses suggestion to my list so hopefully that will be coming in the near future 🙂
I’m loving this latest update but I was hoping to add a few requests to your probably never ending list is there a pregnant lady? I thought there was but I can’t seem to find her:.. as far as requests, medium length curly hair for women, and wavy options for all!
Hi Kayleigh,
Glad to hear you are enjoying the latest update! There isn’t a pregnant woman at this stage, but I will be creating one as an add-on in the new year along with a few other add-ons as well 🙂 Thank you for your hairstyle suggestions, I’ve taken note of all of them. If you have any other questions at all, please don’t hesitate to let me know.
How do I merge a photo with a frame for blog purpose?
Hi Kristin,
You can use Adobe Photoshop to clip your photo inside the frame (I’m assuming that’s what you meant 🙂 So to do that, make sure you have the PNG frame open in Adobe Photoshop. Also have your photo open then Select All and Copy your image. Then head over the frame PNG file. Using the magic wand, make a selection of the inside of the frame by clicking anywhere on the inside of the frame – you should see a selection of just the inside. Then go to menu Edit > Paste Into. This should automatically paste the photo inside your selection you made.
Hope that helps! Happy creating 🙂
Are there really only 3 body shapes? I wanted to make myself. Opened shape 2. “Hm. I’m not quite that rotund. Let’s check out 1. WUW! Not that skinny!! Not by half!! How about 3. Even fatter than 2?? What!? Do you truly have no body shape for a normal, average, not super-skinny but not at all fat either woman?
Aside from that, I’m really excited to make my family. Thanks!
Hi Tatiana, thank you so much for your invaluable feedback. I appreciate your comments and have added your idea of including an in-between body shape to my wish list. I hope you have fun creating your family portrait! 🙂
Hi Lisa,
This is such a wonderful program. Thank you for sharing your talents with us in such a user friendly way. My question for you, is stemming I’m sure from my ability to overthink. What have you found is the best way to print the files? When you send them to the printers flattened, what product do you find works best so that the texture shows well and gives that faux handmade feel.
Thank you for any tips you can share. I have a couple gifts to print out.
Kim
Hi Kim, So happy that you’re enjoying the product! I’m also an over-thinker so you’re in good company 🙂
Definitely send the files flat, this will keep the files size down and make it easy to do universal colour adjustments if needed.
For paper and colour mode settings, I would recommend a card stock that looks similar to watercolour paper – a slight textured, uncoated matt card works really well, it gives it that authentic hand drawn look when printed. Also remember that some printers prefer RGB and some CMYK so it’s definitely best to convert the colour mode of the artwork file to suit the printers request – so definitely check with them first. The file is by default CMYK in Adobe Illustrator and RGB in Adobe Photoshop. If you need to convert colour modes in Adobe Photoshop go to Image > Mode > and choose CMYK. Remember to Save As to preserve the original file.
If you’re using the Adobe Illustrator version of the kit, you can enlarge the portraits to any size without losing quality due to the nature of vector artwork.
If you are using the Adobe Photoshop version I wouldn’t enlarge more than 140% of the original size. Depending on the doc size you created, you could probably safely print it to A3. You can always do a test print at home by enlarging the file to the size you want, then just print a quick sample – even if you don’t have a large printer, you can still print just the area your printer can see, so don’t select “Scale to fit” just leave at 100% and print that portion of your portrait. If you’re happy with the results, it should be fine when you send to a professional shop. I also recommend doing a cheaper test print at the print shop before committing to expensive paper or canvas.
Hope that helps! If you have any other questions at all, please don’t hesitate to let me know.
Could you make people (both adults and kids) in wheel chairs or with crutches? And an add-on hearing aid would be awesome as well!
Hi Angel,
A wheelchair option is definitely on my wish list as it’s something I’d love to include in the set among other things. The biggest hurdle I face is the challenge of recreating the entire kit for each age group and gender in the new position – the current kit took over a year to create so it’s a fairly time consuming exercise. But as mentioned, it is on my list and is something I would love and hope to offer in the future.
Thank you so much for your suggestions! You feedback is much appreciated 🙂
Do you have have a body type for mother’s who are expecting?
Hi Lori, I don’t have a pregnant option yet, but I am planning on starting to work on that in a few weeks time. Let me know if you have any other questions 🙂
How do I save the image once im done so that its in a format in which its not completely blurry and looks good for social media platforms?
Hi Brittany, You can save the file as a jpeg from either Photoshop or Illustrator. To do that go to menu File > Save As and choose Jpeg in Photoshop, and in Illustrator go to File > Export As and choose jpeg. If you haven’t resized the portraits smaller then you should be able to get away with 72dpi, or you could try 96dpi or 120dpi. Choose RGB as the colour profile.
Hope that helps! Let me know if you have any other questions.
So upset, I hope this can be figured out! I purchased all of the portrait packs and watched all of the tutorials in case I missed something, but there are no layers for the actual patterns/designs on the clothing! It’s just for the item itself that can be turned on and off. Which takes away a HUGE value. I downloaded and purchased the latest upgraded pack as well. Opened in both photoshop and illustrator and neither have the layer where you can turn on or off a pattern, or color. Please advise asap!
Oh no! Sorry that you’re upset and struggling to change the patterns and colour of items. The item layer you see in Adobe Photoshop, like the a dress for example, would be the layer you would need to edit or add a pattern to.
To change the patterns on items you would need to import the pattern you’d like to use, the below video tutorial will take you through that. Unfortunately it’s not possible to have all the patterns as separate layers for each clothing item, this would amount to 1000s of layers making the file too large to use and difficult to navigate. So to customise the clothing item with the pattern of your liking, you would need to bring the supplied jpeg pattern file in Adobe Photoshop. The good news is it’s fairly simple to add a new pattern of your choice or change the colour of items. Here’s a tutorial on how to add a pattern:
https://www.lisaglanz.com/blog/apply-patterns-to-clothing-items/
And if you watch the below tutorial at the 5-min mark, I walk you though the process of changing a clothing item colour in Adobe Photoshop:
http://www.lisaglanz.com/blog/create-gorgeous-custom-portraits-seconds/
Hope that helps! If you have any other questions at all, please don’t hesitate to let me know.
Hi Lisa I was wondering how could I update the packer to get all the new updates versions of the woman, hair & etc 🙂
Hi Angelina,
You can access the free update anytime from your account by re-downloading the product again. To do that log into your account on https://www.lisaglanz.com/my-account/ and locate the Portrait Creator in your Orders area. From there click on View and simply re-download the product files again to get the most up-to-date files.
Hope that helps! If you have any other questions at all, please don’t hesitate to let us know.
Hi, Lisa! I was wondering if there’s a way to change the color of pets easily? For instance, the dachshunds you have are red/black & tan. I want to make them red/white. I tried painting the color, but it’s time-consuming and doesn’t look very professional. Any advice is much appreciated!
Hi Jasie,
There are a few ways you can change colours in Adobe Photoshop. For overall colour change you can use the Colour Balance menu found under Image > Adjustments to tweak the overall colour. Or use the magic wand to select colour areas then tweak, or use the Select Color Range to select areas of the same colour them tweak those colours either using the hue and saturation menu or colour balance menu. That would be the quickest way to adjust the colours.
If you want to add any spots or take away markings you don’t want you can use the brush tool – make sure to use the eyedropper tool to first select the colour of the dog, then paint over the markings to erase them. To make sure you don’t paint outside the dog, you can lock the transparency which you’ll find in the layers panel.
Hope that helps! If you have any other questions at all, please don’t hesitate to let me know.
Hi, with what program should I be able to open the zip?
Hi Diana, I just popped you an email, but in case you don’t see that, I’ll include all the info here 🙂
If you’re using a Mac you can simply double-click on the zip icon/file and it should automatically launch the default compression software and unzip the file for you.
If you’re using a PC, often the compression software that comes standard with the PC isn’t the most sophisticated and sometimes can’t handle more complex files. But you can try that first by right clicking on . zip file, and click on “Extract All” in context menu. In “Extract Compressed (Zipped) Folders” dialog, enter or browse folder path where you want files to be extracted.
For the best results you can use Winzip: https://www.winzip.com/.
Or here are some free alternatives you can try (be sure to download the one that matches your operating system:
https://www.7-zip.org/
https://www.peazip.org/
https://www.zipware.org/
Hope that helps! If you have any other questions at all, please don’t hesitate to let me know.
I no longer have Adobe products, so using Affinity Designer. I have downloaded and unzipped, but do not have the Instruction PDF. Could you email this to me. Thank you.
Hi Ali, I’ve just popped you an email to assist you with the instruction PDF file 🙂 Please also check your spam folder if you don’t see it in your inbox, thank you!
I just purchased and my download for Illustrator did not include the instructions PDF.
Hi Bethany, Thank you so much for your purchase, it’s much appreciated! The pdf instructions can be found right at the top of the listed items. But I’ll pop you an email with a download link as well 🙂
I wasnt expected that I need also adobe photoshop, wich is very expensive, very disappointed…I cant use it without it….
So sorry that you’re disappointed! I make sure to be as clear as possible about the required software for my products so customers can make an informed decision before purchasing. The great news is there are alternatives for you that are definitely more cost-effective than Adobe apps. I’ll pop you an email to assist you further 🙂
Hi, I am loving the program so far, but I want to change a hair color, but as I change the color of the hair the detail goes away how do I add a new hair color but keep the detail?
Hi Liz, SO glad you are enjoying the kit. I’m assuming you are using Adobe Photoshop? I have a tutorial that shows you how to change the hair colour without losing the detail, you can find it here. Hope that helps! If you have any other questions at all, please don’t hesitate to let me know.
Hello
I purchased the Personalized Portrait Designer Kit. I was very excited to try it out. I downloaded it into Adobe Illustrator which I just downloaded the 2020 version of. However, when the download completed I tried to open it and I got a message saying that Adobe Illustrator could not open it because the format was unfamiliar. My question is did I download it incorrectly. I was unable to see any instructions on how to do it. Can you send me instructions on how to properly download it. Thank you in advance.
Hi Keely,
Thank you so much for your purchase, it’s much appreciated! I’d be happy to assist you with that 🙂 Once downloaded 100% complete, make sure you unzip the file completely before opening up in documents.
It’s also super important that you only open the AI (Adobe Illustrator) files in Adobe Illustrator. The most common mistake is opening up the wrong format files in your app. So make sure you are only working with files in the Adobe Illustrator folder and opening files that end with a .ai. The Adobe Photoshop files will give you that error if you try to open them in Adobe Illustrator.
Hope that helps! If you have any other questions at all, please don’t hesitate to let me know.
Is there a way to change skin color of the girl 2-5? I need a skin color between the shade 2 and 3 and when I try to fill it gets rid of the nose and mouth.
Hi Amy, yes definitely! You can use the Hue and Saturation menu to adjust the body layer overall, or the Color Balance menu. Play with the sliders to achieve your desired colour. Once you’ve adjusted the body layer, you can then adjust the cheeks to suit the new skin tone. Hope that helps! If you have any other questions at all, please don’t hesitate to let me know.
Hello.
I’m about to purchase your kit, this is awesome and so many possibilities.
do you plan on adding more pets ? i am a bird owner i have 2 cockatiels it would be so cool to add them to the family portrait.
Hi Clemence, Thank you so much for your interest in my product! I am hoping to add more pets or create an add-on for pets. I do however work on the most requested items/pets so I will definitely add your suggestions to my ever-growing list of requests for possible inclusion in the future. If you have any other questions at all, please don’t hesitate to let me know.
Hi there.
In illustrator, when choosing layers, the eye icon is faded in some of the boxes….what does that mean? I am unable to apply hair at this point? thank you
Hi Anna, The eye icon is usually greyed out if the main layer group isn’t active and turned on. To select items and make them visible, you would need to turn on the eye icon (ie. make the layer visible) of the main “parent” layer folder first.
For example, if you wanted to choose a colour of a certain hair style you would need to turn on the Hair Layer (which should be on by default), then turn on the hairstyle layer you like, then you can turn on the colour you want to use. So in short, remember to turn the “parent” layers on first in order to activate the sub-layers.
Hope that answers your question. If you have any other questions at all, please don’t hesitate to let me know.
Perfect! That did it. Thank you!
Fantastic! Glad I could help Happy creating your portraits!
Great idea..
Hi,
I just purchased your portrait creator and sadly I can’t seem to see the layers. I’m using Adobe Illustrator on my ipad and I am wondering if I can’t use this programme on an IPad? Thank you so much for your help!
Hi there, the required software is the full version of the Adobe apps. Unfortunately the mini mobile versions can’t handle the complex layered files.
If you don’t have access to the full Adobe apps, the Portrait Creator also works in Affinity Designer for Desktop. They are currently offering an extended free trial period plus the software is 50% which is a huge savings! It’s definitely worth having a look at.
Hope that helps! If you have any other questions please feel free to send me an email here.
Hello,
Are there any alternative softwares you can recommend that aren’t Adobe?
Thank you
Jenny
Yes absolutely! The Portrait Creator works well in Affinity Designer (desktop version) as well as a free online app called Photopea.com. Both of those apps can open and edit the Photoshop version of the Portrait Creator perfectly. The steps are very similar to Photoshop. Hope that answers your questions 🙂 Pop me an email if you still have questions – [email protected]